May be the title itself seems silly for the most of MAC users why I’m sharing this. Actually it’s especially for the new mac users those who don’t know how to do this kind of stuff.
I was curious about how to take screenshots in MAC. I was a windows user for more than 18 years and I used Linux for 4 years for developing web applications. My transition from windows env. to Mac was during 2019 and I learned a lot during this transition period. Once I changed to Mac obviously I was like a snail for finding a way to do stuff with shortcuts.
Recently, I found a way to take screenshots on a mac and it was just awesome on Mac OS how they give the user provision to take the screenshots.
Here is the official documentation for the screenshots section. I hope it’s helpful for the mac noobs! like me 🙂
Since the 1970’s, Vi and its successor Vim have been included by default on many operating systems, including almost all GNU/Linux distributions.
Vim is free and open-source and is one of the most popular code editors. It can be downloaded on Vim official site.
vi (vim) line navigation FAQ: What is the vi command to move to the end of the current line? (How do I move to the end of the current line in vim?)
Short answer: When in vi/vim command mode, use the “$” character to move to the end of the current line.
Movement
h j k l
Basic movement keys. A step up from the cursor keys simply because they are already under your fingers. Most useful when prefixed with a number (e.g. if you need to move down by about 10 lines, hit “10j” instead of just holding j until you get there).
b w B W
Move back by token/forward by token/back by word/forward by word. (A token is a sequence of letters, digits, and underscores. For the capital letter variations, a word consists of anything that’s not whitespace.) Faster than holding down a simple directional key.
0 ^ $
Jump to first column/first non-whitespace character/end of line, like Home and End. Faster than moving by words if you’re trying to get to the opposite end of the line.
ctrl+u ctrl+d
Basically Page Up and Page Down, but moves by half a screenful and doesn’t lose your cursor position.
<line-number>G
Jump directly to a specific line number. Most helpful if you also have line numbering enabled (:set number).
H M L
Move to the top/middle/bottom of the screen (i.e. High/Middle/Low). A good first step in getting approximately to where you want to go.
# *
Find the previous/next occurrence of the token under the cursor.
n N
Repeat the last find command forward/backward.
“
(That’s two back-ticks). Jump back to where you just were. This will jump back and forth between the same two locations if you keep pressing it.
ctrl+o ctrl+i
Move backward/forward through the jump history. Useful if you have followed a chain of method calls and need to get back to where you were.
Editing
In Vim, you spend most of your time in “normal” mode, switching to “insert” mode only when you need to add or change some text. This way, all edits become their own self-contained operations that can be repeated or chained with other operations. Most editing commands may optionally be preceded by a number in order to apply it more than once (e.g. to delete three lines, press 3dd).
i a I A
Enter insert mode (insert at cursor/append after cursor/insert at beginning of line/append to end of line). Press Esc to exit insert mode and return to normal mode. It’s rarely useful to precede one of these commands with a number, but it can come in handy. Need a comma-separated list of eight 1s? Just hit “8i1, <esc>” then delete the trailing comma.
o O
Open new line (below the current line/above the current line). A quick “o<esc>” will add a blank line below the current line, no matter where your cursor is.
cw cW
Correct the token(s)/word(s) following the cursor. Basically combines delete and insert into one step.
cc
Correct line(s) by clearing and then entering insert mode. Starts inserting at the current indent level.
dd
Delete line(s). Quickly rearrange lines by deleting them, moving to the new location, and pasting with “p”.
ct cf ci ca
dt df di da
Correct/delete up to or including specific characters. Since there are many variations, I break it down in the section below about correcting text.
s
Delete character(s) at the cursor and then enter insert mode. cw is usually faster if you want to correct an entire word, but this is useful for correcting a fixed number of characters (e.g. “5s” will correct the next five characters).
yy
Copy line(s). The “y” is for “yank.”
yw yW
Copy token(s)/word(s).
p P
Paste the last thing that was deleted or copied before/after cursor (for more advanced usage, you can precede it with a register specification, but that’s a topic for another day).
u ctrl+r
Undo and redo.
.
(That’s a period). Repeat the previous edit command. I use this all the time. Did you just add a line (e.g. using “o” or “O”) that you need to duplicate five more times with only slight modifications? Hit “5.” to repeat that operation, then make your modifications; no copy/paste needed.
Correcting Text
In a boring text editor, you are limited to very basic operations: highlight some text, delete it, type more text. Vim has the ability to highlight (it’s called “visual” mode), but I rarely use it. It is often much faster to achieve the same thing using a few editing commands.
I frequently need to correct some text that doesn’t fall neatly onto a token or word boundary. Fortunately, operations like “c” (correct) and “d” (delete) have a number of operators that may be applied to them:
t<char> – exclusive match: continue up to (but not including) the next <char> on this line
f<char> – inclusive match: continue up to (and including) the next <char> on this line
i<char> – exclusive inner match: apply to text bounded by <char>, where <char> is from a limited set of characters that come in pairs, like quotes, parentheses, brackets, etc.
a<char> – inclusive inner match: same as above, except it includes <char> on both ends
Say that I have the code below, and I want to completely replace the code inside the map() with something else:
The first thing I need to do is get my cursor anywhere inside the parentheses belonging to map(). The exact command I use depends on where I end up:
If the cursor is just inside the open paren for map(), I could use “cf)”. This corrects all text up to and including the next “)” on this line.
Say the cursor is on the word “format”. I would do “ci(”. Vim will search backward to find the first open paren, then search forward to find its match, and correct the text between (but not including) those characters.
Maybe my cursor was already closest to the word “cookies.” To break out of the inner parentheses, I would need to add a count and do “2ci(”. This is almost identical to the last example, except that the 2 is needed due to the nested parentheses.
I’m now in insert mode so I can carry on by entering the new text.
Other vi/vim line related commands
While I’m in the vi line neighborhood, here’s a longer answer, with a list of “vi/vim go to line” commands:
vi command
description
0
move to beginning of the current line
$
move to end of line
H
move to the top of the current window (high)
M
move to the middle of the current window (middle)
L
move to the bottom line of the current window (low)
1G
move to the first line of the file
20G
move to the 20th line of the file
G
move to the last line of the file
Just to be clear, you need to be in the vi/vim command mode to issue these commands. Getting into command mode is typically very simple, just hit the [Esc] key and you are usually there.
Move up or down multiple lines with vim
You can also use the [Up] and [Down] arrow keys to move up and down lines in the vi or vim editor. But did you know that when you’re in vi command mode, you can precede the [Up] or [Down] arrow keys with a number? For instance, if you want to move up 20 lines in the current file, you can type this:
I’d a requirement earlier to get tt_content data array inside FLUID template of extended fe_login. But it’s not there by default like any conventional TYPO3 content element or EXTBASE extension modules. I think about several methods to achieve this, here are the methods I tried and failed to achieve.
DataProcessors
TYPOSCRIPT Variables
ViewHelpers
All these methods failed and not effective. Finally, I fed up and gone through the implementation for XCLASS although it was not recommended. Finally I got a method to achieve my requirements. In TYPO3 if you’re using the fluid template extended then it throws an event from the event dispatcher through EXTBASE framework. You could get an idea what an event dispatcher looks like from the following documentation. https://docs.typo3.org/m/typo3/reference-coreapi/master/en-us/ApiOverview/Hooks/EventDispatcher/Index.html
So it was my first time using an event dispatcher even though I used Hooks and Signal Slots before in TYPO3 several times. When I went through the LoginController of fe_login I saw the code which shows an event is thrown from the controller. I thought it was something which is exactly the same as the signal slot dispatcher works. The implementation how it should work is explained below in the Solution section.
Solution
If you read the above section it’s mentioned that our hero of attraction is event dispatcher. Here is how it works. In core the event is thrown like below.
So we need to invoke this event in our custom extension. Let’s say it’s something like site_package our custom extension. These are the steps for invoking the event.
Step 1: Create a file called Services.yaml inside the path EXT:site_package/Configuration/Services.yaml
Step 2: You need to configure your Event Listener class in the above created yaml file.
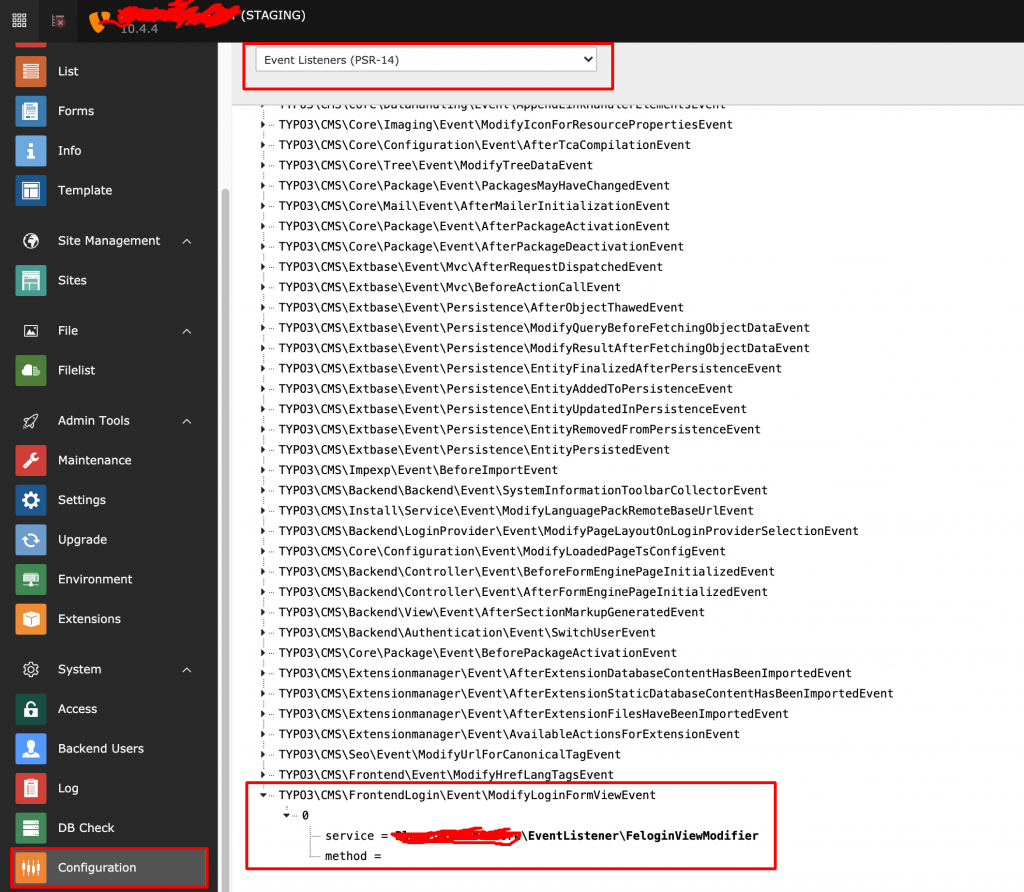
Here the identifier should be unique that’s it. You can check this whether the configuration has been added to the installation through TYPO3 Backend. In configuration module backend there is an option for viewing the event listeners PSR-14.
Backend Module Configuration
Step 3: Code Properly the EventListener Class for achieving whatever you need to achieve.
<?php
namespace VendorName\SitePackage\EventListener;

use TYPO3\CMS\FrontendLogin\Event\ModifyLoginFormViewEvent;
use TYPO3\CMS\Core\Utility\GeneralUtility;

/**
 * Class FeloginViewModifier
 * @package VendorName\SitePackage\EventListener
 */
class FeloginViewModifier
{
    /**
     * @param ModifyLoginFormViewEvent $event
     */
    public function __invoke(ModifyLoginFormViewEvent $event): void
    {
        $objectManager = GeneralUtility::makeInstance('TYPO3\\CMS\Extbase\\Object\\ObjectManager');
        $configurationManager = $objectManager->get('TYPO3\\CMS\\Extbase\\Configuration\\ConfigurationManager');
        $data = $configurationManager->getContentObject()->data;
        if (!empty($data) && $data['CType'] == 'felogin_login') {
            $ttContentUid = $data['uid'];
            $fileRepository = GeneralUtility::makeInstance(\TYPO3\CMS\Core\Resource\FileRepository::class);
            $fileObjects = $fileRepository->findByRelation('tt_content', 'assets', $ttContentUid);
            $event->getView()->assign('ttContent', $data);
            $event->getView()->assign('assetFile', $fileObjects);
        }
    }
}
Now the assigned variables is available for you in your extended template. Cheers! If this vlog helped you I will be really happy. Looking forward to more subjects.

Recent Comments